In previous blog posts, I have been discussing some aspects of whole-cell patch clamp recordings ([1], [2], [3], [4]). Today, I will show some instructive videos that I recorded during experiments. I’m hoping that they will convey the look and feel of the procedure of whole-cell patching in an intact brain using two-photon microscopy to target neurons.
Two-photon targeted patching is the core method of my recent paper on a precise synaptic balance of input currents, focusing on biological questions instead of methods (Rupprecht et al. (2018)). The underlying method has been described before as “shadow-patching”. Dye ejected from the pipette allows to visualize cell bodies as dark shadows in a sea of fluorescence (see Kitamura et al. (2008); also check out Judkewitz et al. (2009), Margrie et al. (2003) and Komai et al. (2008)). Although these papers are very useful resources, they do not allow to understand how the procedure of patching a neuron looks and feels like to the experimenter.
For camera-based whole-cell patch clamp recordings in slices or dissociated cultures, on the other hand, there are a handful of videos on the internet (for example this one). However, this looks quite different from patching targeted by two-photon imaging. Camera-based imaging only allows to patch in thin tissues like cultures or slices since camera-imaging does not provide good optical sectioning and penetration. Here, I will show (uncut) movies of the process of patching, while monitoring the applied pressure and the test pulses.
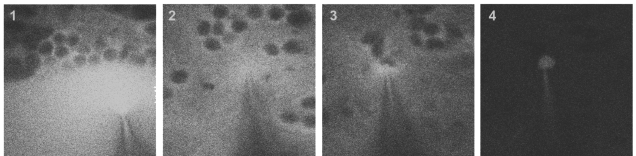
As a brief introduction to two-photon targeted shadow-patching, the pipette approaches the brain surface while blowing out dye (1). After entering the tissue and after lowering of the pressure (2), the pipette closely approaches a target neuron (3). After gigaseal formation and break-in, allowing for electrophysiological recordings, the targeted neuron fills with the dye while the surroundings turn dark again (4).
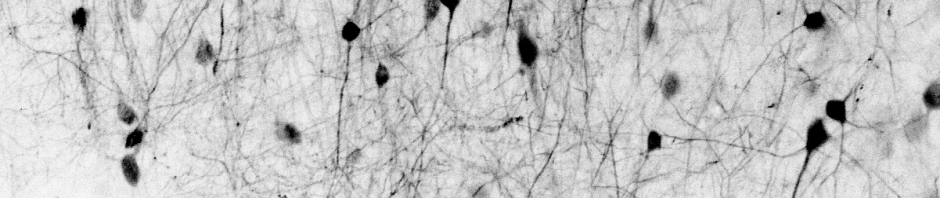
All of the videos below are patch clamp recordings in the olfactory cortex homolog of zebrafish in an ex vivo preparation where the entire brain including the nose remain intact. Neurons are labeled using pan-neuronal expression of GCaMP6f, which is barely visible compared to the dye; shadow-imaging is performed using a resonant scanning microscope (described before on this blog). Neuronal somata in this brain area are quite small (5-8 μm in diameter, which is probably half or less the size of a typical mouse principal neuron), which can render targeted patching quite difficult, especially in deeper structures, where resolution degrades due to scattering. All of the recordings below are in more or less superficial regions (<200 μm below the brain surface). Patching deeper neurons usually required much more focused attention from my side, and the pipette tip could not be localized as easily as in the movies below.
For the paper, I produced a “Methods Video”, which due to restrictions from Neuron is limited to a duration of 1 min. I wanted to record not only the fluorescence movie during patching, but also the pressure and the test pulses applied to the electrode. For screen capture, I used the software TinyTake; for video editing, KdenLive (Linux); for text to speech synthesis of the next video, Wavenet provided by Google Cloud, which I have discussed before on this blog). The video is available in the Star Methods section of the paper, and also here:
However, the short duration of the video is maybe appropriate as a short visual summary for a paper, but not ideal for somebody who wants to get an intuition on how shadow patching can be done in reality. Therefore, here’s a longer excerpt of the same recording. I sometimes use this excerpt for presentations:
Still, this is a bit too condensed. Therefore, below you will find the uncut version of this particular patching experience. I admit it is really boring to watch, but I think it is also instructive. Not shown in the video are the changing positions of the two micromanipulators that move the pipette tip and the focus of the microscope; also not shown are small modifications to the laser power, zoom settings, bidirectional scan phase or the electrophysiological recording conditions. And yes, I’m aware that this recording is far from being perfect, but I think it can still be a useful starting point for a prospective electrophysiologist.
Next comes the patching of a different neuron. Usually, I’m using a syringe to apply pressure and suction to the pipette (other people prefer to apply the suction with the mouth). Here, after establishment of the giga-seal, the syringe somehow broke down and was not useable any more. I quickly constructed a temporary mouthpiece out of some tubings and finally managed to successfully break into the cell.
And here yet another successful attempt:
In total, I made around 20 such simultaneous recordings of the two-photon video, the pressure indicator and the test pulses window. Assembling the videos, however, turned out to take quite some time, and therefore I will show only one more movie, this time of a failed attempt. Almost immediately after entering the tissue, I realized that this recording would probably be not successful (the dura covering the brain sticked to the pipette tip for too long). Usually I would have stopped the attempt as early as possible in order not to waste time. In this case, I still tried to patch a neuron in order to get a nice recording of a failed attempt. Failures are not really rare when you try patching, especially in deep and small neurons.
Of course, shadow-patching might look somewhat different in a different brain region or with a different microscope or at a different tissue depth. To give you an idea, here is a recording with lower light levels due to lower dye concentration and laser power and with some problems related to the microscope (which I was too lazy to debug back then) which did not allow to zoom in as much as for the previous recordings. For someone not familiar with the particular setup, it is probably quite difficult to accurately see the pipette tip – which is crucial to move the pipette to the right location, in particular in the z-direction.

Pingback: Whole-cell patch clamp, part 1: introductory reading | A blog about neurophysiology
Good afternoon Peter,
I am an italian electrophysiologist and I’d like to ask you some technical questions about the syringe you use for the suction (I usually apply the suction with the mouth).
Do you use a glass syringe? How does the sistem look like? (Do you have some videos?)
Ethan you vero much
Hi Claudia,
When I started patching, I was trying mouth-suction as well, but I had problems with the suction affecting the stability of my front teeth, and in addition I didn’t want to have something between my lips all the time. Also, it’s better if you want to teach students or interested persons. Sharing a syringe is better than sharing a mouth-sucking system.
I did not use a glass syringe, simply because I had none available. I used a simple 10 mL or 20 mL plastic syringe. Nothing special! I think it is possible to be extremely precise also with syringe-based patching. After the break-in, it is important to immediately release the pressure. This is in my experience easy to do by simply disconnecting the syringe (instead of having a mechanical manual switch installed, which is too slow). It is important that the connection between syringe and suction system is not super tight, in order to allow to quickly disconnect the syringe.
For me, key to success was the pressure monitoring device (also seen in the videos above), which allowed me to set reproducible pressures or suction values, and also to quickly see whether there was a leak in the suction system (seen by decreasing pressure). Leaks in the suction system do not make patching impossible, but why make a already difficult problem even more difficult?
I cannot make a video of the entire system right now, since I moved to a different lab in 2019. But if you have specific questions, I could maybe help you out!
Best,
Peter